Part III. Deploy local F5 Gilan blueprint and create traffic server VM
Step 1. Deploy Gilan blueprint
Once you change all the values in the Gi LAN inputs file and save it locally, upload the file in F5 VNF Manager. It will define all required parameters for the F5 Gilan yaml blueprint.
- Open F5 VNFM, click Local Blueprints. The F5-VNF-Service-Layer-GiLAN_1.0.0.1 main blueprint file appears.
- Click Deploy.
- Enter a name, under Deployment Inputs, click
 browse for the inputs_gilan_udf-v3.yaml file you edited, and then click Open. The Deploy blueprint form is completed automatically with the values you entered in the gilan_inputs.yaml file. Click Deploy
Warning
Deployment name should be a single word with no spaces, dashes or special characters
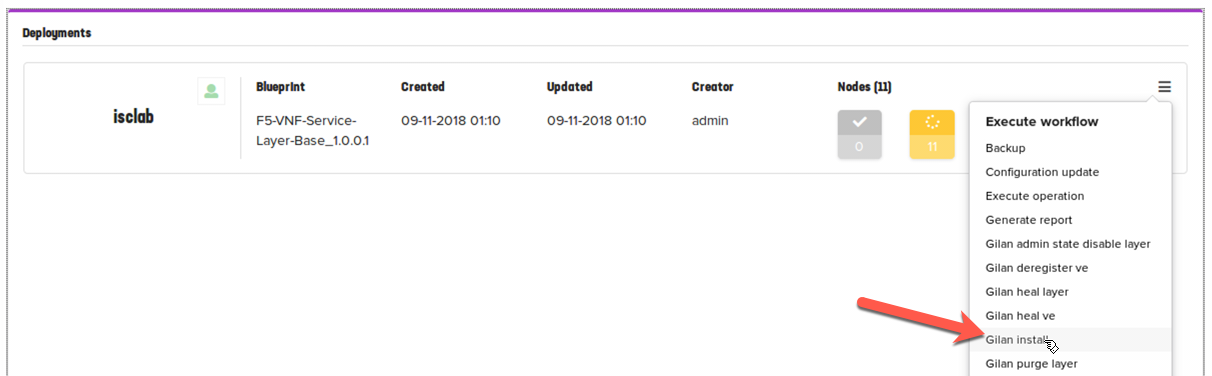
- On the left-side menu click the Deployments blade, in the list next to blueprint you created in the preivous step, expand
 , click Gilan install, and then click Execute. VNFM starts creating BIG-IP VEs according to the parameters you defined for your network. Also installed includes additional, sub-blueprints packaged with the F5 gilan blueprint.
Note
You may see the following error appearing intermittently during the first few minutes of deployment. It doesn’t affect the deployment process

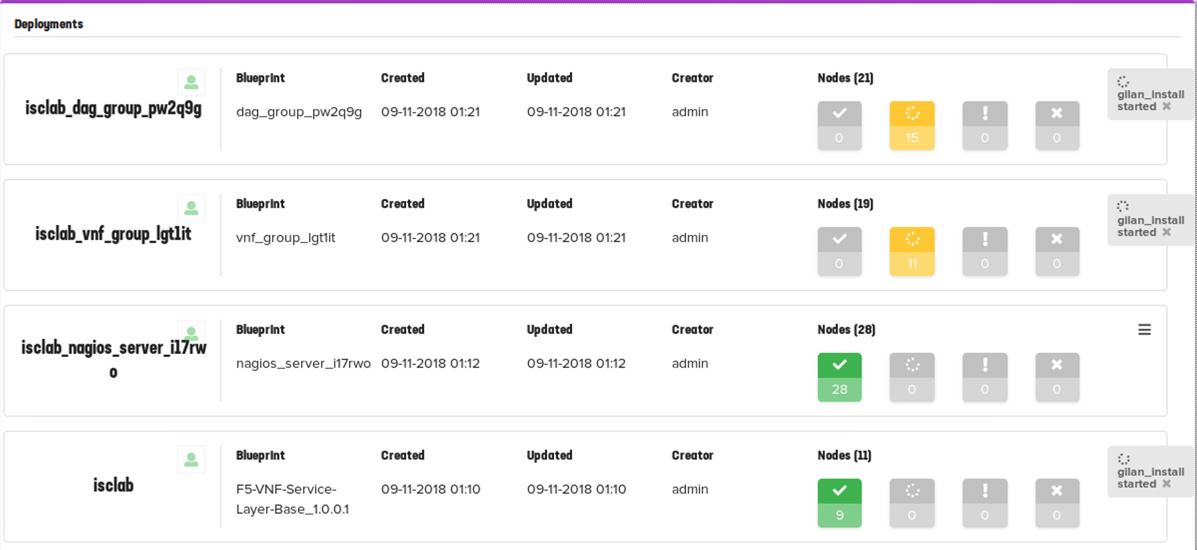
- To view the list of Gilan workflows (for example, scale out group, deregister VE, etc.) that you can run, on the Deployments blade, click next to your Gilan deployment in the list. A list of applicable workflows for your solution appears. Learn more about Run Workflows
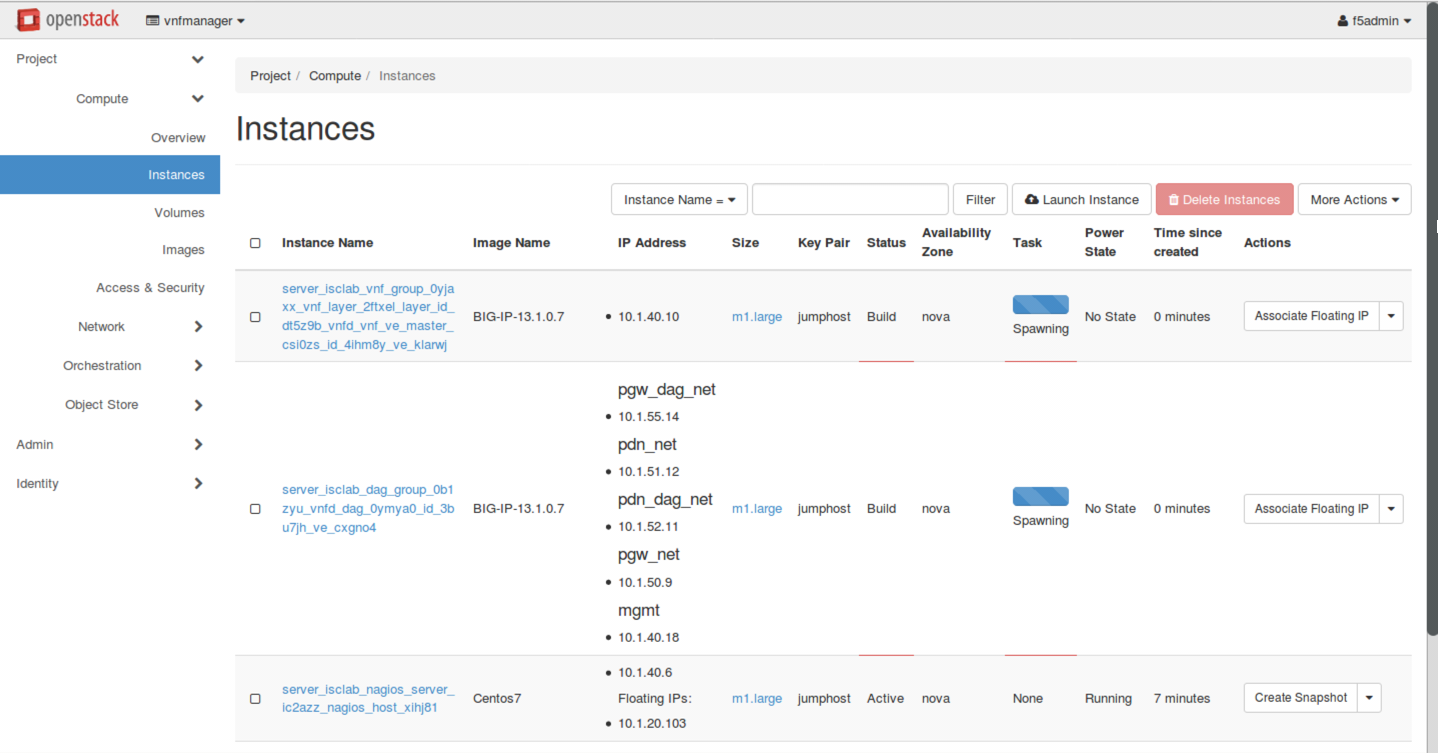
- To view the multiple BIP-IP VEs created by installing your F5 Gilan blueprint, open your OpenStack project and navigate to .
Note
Deployment will take 40-45 minutes to complete. Monitor the process by viewing Deployments screen until all nodes are green
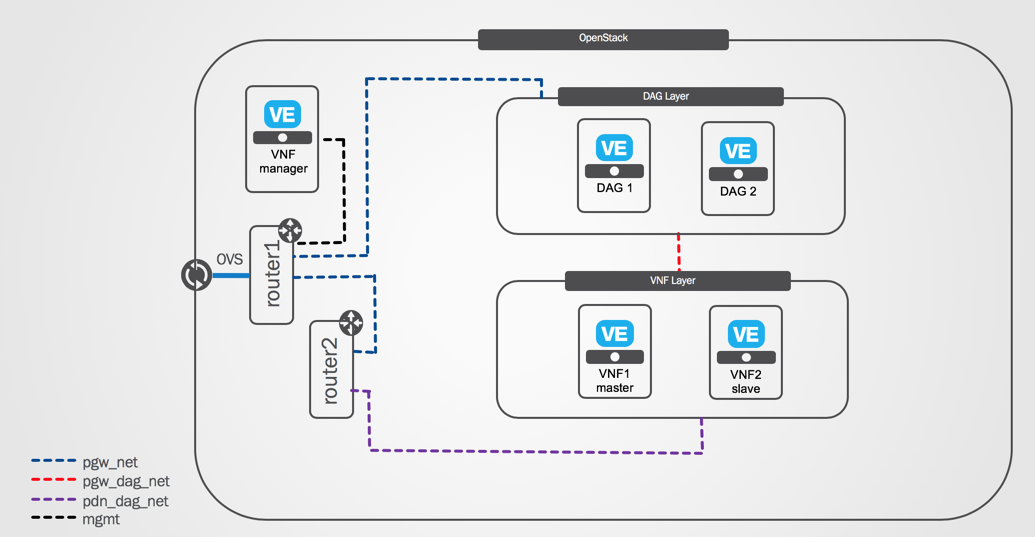
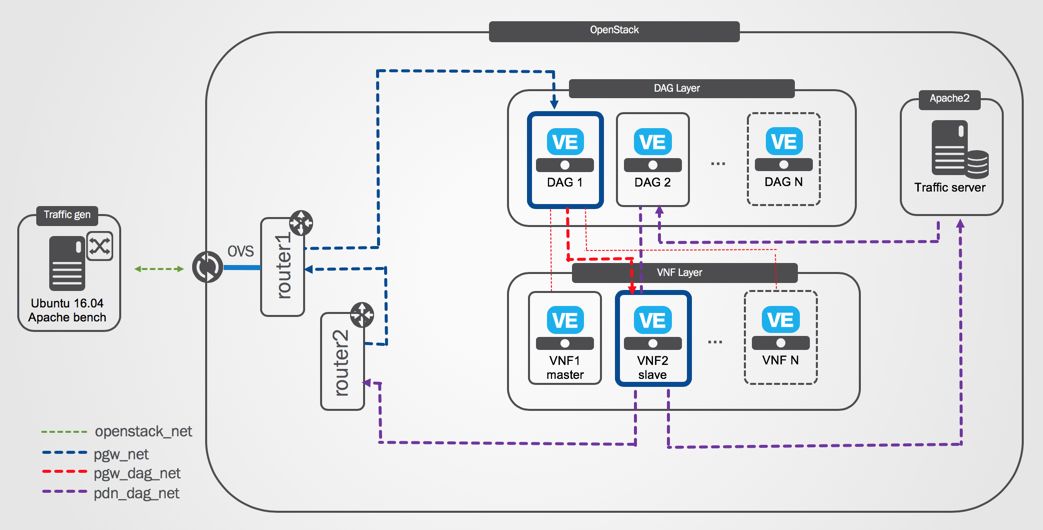
Resulting Gilan deployment architecture includes 2 DAG and 2 ( master + 1 slave) VNF instances:

For more information about Install Workflow see: Install Workflow
Step 2. Stand up traffic server VM
Server VM can be launched from CLI or using Horizon UI.
- To launch traffic server VM from CLI SSH to controller_neutron VM

Run the following script:
#./create_trafficserver.sh
Note
Script will perform the following actions automatically to simplify lab process: 1. Add route to traffic_server via DAG1 on router1 2. Add route to client via DAG2 in userdata.sh for traffic_server 3. Stand up traffic server with corresponding neutron port/ip and userdata.sh as user data
- Verify traffic_server VM is in Running state and has correct IP assigned

Review target traffic flows
Note
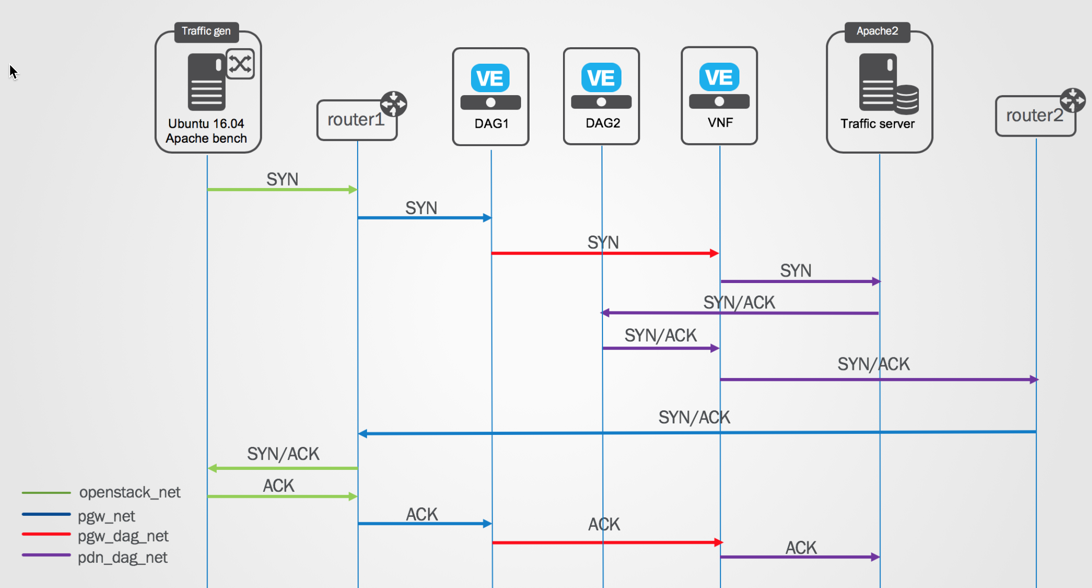
This lab uses pdn_dag_net to return traffic from server to DAG2 instance. This is due to various environment limitations
Three-way TCP handshake flow:
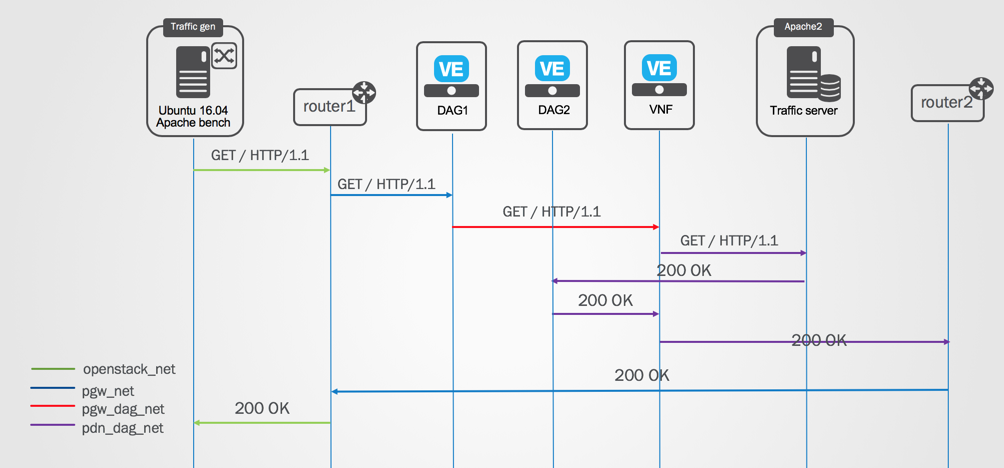
Apache Bench HTTP request flow:
Note
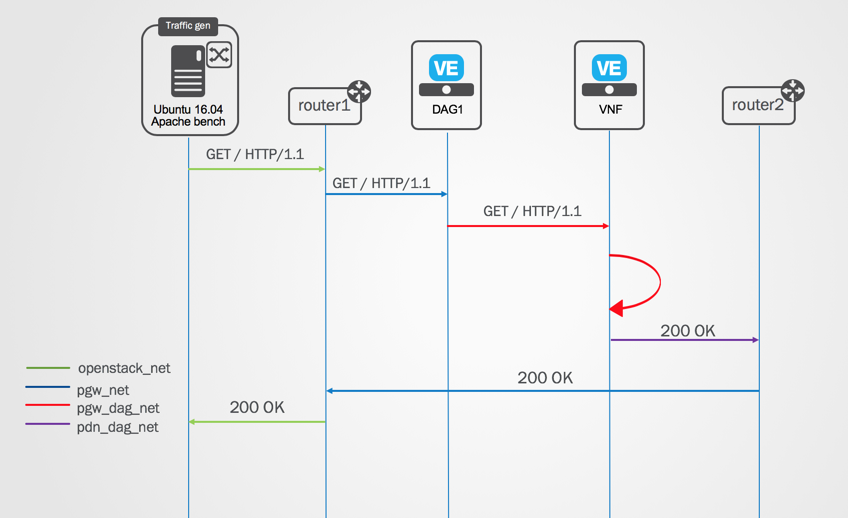
For load testing VNF BIG-IP uses a special “CPU killer” iRule which generates a 200 OK answer locally without forwarding traffic to the server for client IP ending with .21 - .24 (.20 IP is passed to traffic server)
Apache Bench Load test flow:
Step 3. Run test traffic to validate connectivity
SSH to UDF traffic_gen VM and run Apache Bench and curl commands
sudo ab -n 10 -c 1 -b 1400 -B 10.1.20.20 http://10.1.52.101/
sudo ab -n 10 -c 1 -b 1400 -B 10.1.20.21 http://10.1.52.101/
sudo ab -n 10 -c 1 -b 1400 -B 10.1.20.22 http://10.1.52.101/
curl --interface eth1 http://10.1.52.101/
curl --interface eth1:0 http://10.1.52.101/
curl --interface eth1:1 http://10.1.52.101/
AB Output should contain statisticcal information on average RTT and # of bytes sent/received, among other data. Ensure Apache Bench received data back from the server.
Benchmarking 10.1.52.101 (be patient).....done


Server Software:        Apache/2.4.6
Server Hostname:        10.1.52.101
Server Port:            80

Document Path:          /
Document Length:        4897 bytes

Concurrency Level:      1
Time taken for tests:   0.067 seconds
Complete requests:      10
Failed requests:        0
Non-2xx responses:      10
Total transferred:      51680 bytes
HTML transferred:       48970 bytes
Requests per second:    150.03 [#/sec] (mean)
Time per request:       6.665 [ms] (mean)
Time per request:       6.665 [ms] (mean, across all concurrent requests)
Transfer rate:          757.16 [Kbytes/sec] received

Connection Times (ms)
            min  mean[+/-sd] median   max
Connect:        1    2   1.2      1       5
Processing:     4    5   0.4      5       6
Waiting:        1    2   0.3      2       2
Total:          6    7   1.4      6      10

Percentage of the requests served within a certain time (ms)
50%      6
66%      6
75%      6
80%      7
90%     10
95%     10
98%     10
99%     10
100%     10 (longest request)
Curl output should depend on the source IP used - for a default client IP (eth1 - 10.1.20.20) curl will return a XML payload in HTTP answer. For other client IPs ( eth1:0-eth1:3 10.1.20.21 - .24) curl will return “Hello!” generated by VNF BIG-IP
curl --interface eth1:0 http://10.1.52.101/
Thursday November,08 2018 - 14:40:38 (UTC)
Hello!
What’s Next?